-40%
Multifunction Voltage current bearing power capacity time battery charge put
$ 3.16
- Description
- Size Guide
Description
Store CategoriesStore Categories
Electronic Components & tool
Magnet
Welding tool
Thermal Paste
Solder Paste
Soldering Wire
Spot Welders
Socket Connector
Electronic tools
Engraver Pen
Repair Watch tool
Rain Gauge
LED Light
LED Lamp Base
LED String
LED Light Bulb
LED DIP Light
LED SMD Light
Diodes/Rectifiers
Capacitor/Resistor
Switch
other
ICs
other
Arduino Module
Arduino
Nodemcu
ESP series
WEMOS D1
Mega
Motor Drive Module
other
Module & Development Board
Amplifier
Signal Generator/Transmitter
USB Module
Development Board
Power Module?DC-DC and DC-AC?
Clock Module
Bluetooth Module
Breadboard
Digital Thermostat
Controller
LCD/LED/TFT Disply
Logic board
WIFI/Wireless Module
Server Module
Relay
Sensor
Voice Module
Voltage Regulator
other
Meter
Current Voltage meter
Tester
Multimeter
Analysis Instruments
other
Raspberry/Orange Pi
Orange Pi
Expansion Board
Raspberry Pi
other
3D Printers & Accessories
Bearing
Jaw Shaft
Pump
other
Flight Control APM
Drone accessories
RC Drone
other
Auto Parts & Accessories
Grille Logo
Car Sun visor
Car Lights
Car DVRs
GPS & Accessories
Car Electronics Parts/Accessor
Car Audio & Monitor
Car Alarm & Security
Diagnostic Scan Tool
Car Repair & Maintenance
Electric Scooters
Car Cradles & Mounts
Motor
other
Fashion/Beauty
Beauty
Beauty tools
Makeup brush
Earring/Quartz watches
Jewelry
Baby Products
other
Fashion/Health
Maternal and Child Health
Healthy Medical Product
Fitness
Smart wristband
Oral health
Blood Pressure Monitor
Otoscope
Massager
Humidity Thermometer
other
Smart Electronics
Tracker/Anti Lost Device
Alarm System
Electric Charging tool
Solar Power
Cables|Connect?ors|PCB|kits
Dupont Wire
Adapter
USB Socket Converter
USB Converter Cable
DIY Kit
HDMI
Computers,TV Home Audio Electr
Keyboard
Mouse
Heatsink
Cooling fan
Screen/Media player
Wireless Receiver Devices
TV Box
Networking Adapters&Antennas
Games Accessories
Consumer Electronics
Camera
Headset
Power Bank
Speaker
Microphone
Radio
Smart Switch
PIR Sensor
Memory
Fingerprint Lock
Smart Watch
Clock
Electronic scale
Humidifier
Steam brush
Projector
Flashlight
other
Motorcycles & Accessories
Bicycle
Motorcycle
other
Toys
Magic Cube
Playing Card
Mask
Gyro/Hand Spinner
RC Cars
Other
other
Battery
Lithium battery PCB board
lithium/Li-ion battery
Battery Case
other
Sports & Outdoor
Fishing�&�Hunting
SOS kit
Camping light
other
Other
Product View
Detail
Features:
Voltage and current meter power capacity time undervoltage and overvoltage protection multifunction battery charge discharge control
1. Product Highlights
• The measurement circuit draws power from the power input port and does not require an additional power cord.
• LCD display, which can display voltage, current, power, discharge mAH, discharge time and operating temperature.
• Complete protection mechanism with various protections such as undervoltage protection, overvoltage protection, overcurrent protection, overpower protection, overtemperature protection, overtime protection and over capacity.
• Overcharge and overdischarge control of the battery can be achieved by setting appropriate undervoltage protection and overvoltage protection thresholds.
• Timed and quantified battery charging and discharging can be achieved by setting appropriate timeout protection and over capacity protection thresholds.
2. Product Description
2.1 Product Features
1, LCD display
In normal mode, the LCD displays the input voltage and operating temperature on the upside; the downlink shows the real-time current, power, capacity, and discharge time.
In protected mode, the LCD displays the protection code.
In the setting mode, the LCD displays various setting parameter codes and parameter thresholds.
2, sound and light alarm
When the output of the voltage ammeter is turned on, the RUN indicator is always on and the buzzer is not ringing; when it is off, the RUN indicator is off and the buzzer is not ringing. After entering the protection mode, the buzzer will drop the alarm and the RUN indicator will flash.
3, charge and discharge capacity and time automatic statistics, as long as the output is turned on (RUN indicator is always on) to start statistics, turn off the output (RUN indicator is not lit), stop statistics, power-down statistics are automatically cleared, in the display capacity and time When the interface is pressed, long press the button - the corresponding data can be cleared. Please clear the statistics before starting the statistics. The maximum discharge capacity (OAH) and maximum discharge time (OHP) can be set to on or off in the setting mode (default off). After opening, the threshold value can be set. When the threshold is exceeded, the output is automatically turned off and the buzzer alarms. The battery is charged and discharged.
4. By setting the appropriate overvoltage protection threshold and undervoltage protection threshold, the overcharge and overdischarge control of the battery can be realized.
5. Perfect software and hardware protection mechanism, and the software protection threshold can be adjusted. After software protection, the output is turned off.
Hardware protection:
The module input port has anti-reverse protection, and the reverse connection does not burn.
Software protection:
OVP over-voltage protection (default 38V, can be set by yourself, after over-voltage protection, RUN indicator flashes, LCD interface displays OVP. In battery charging, setting the appropriate threshold can effectively prevent battery overcharge);
OCP overcurrent protection (default 5.5A, can be set by yourself, after overcurrent protection, RUN indicator flashes, LCD displays OCP);
OPP over power protection (default 200W, can be set by yourself, after over power protection, RUN indicator flashes, LCD displays OPP);
OTP over temperature protection (default 80 °C, can be set by yourself, after over temperature protection, RUN indicator flashes, LCD shows OTP);
LVP undervoltage protection (default 4.8V, can be set by yourself, after undervoltage protection, RUN indicator flashes, LCD shows LVP, in battery discharge test and other applications, set the appropriate LVP, can effectively prevent battery over-discharge, so as not to damage the battery )
6. The voltage and current meter output is enabled by default.
7, all settable parameters support power-down storage.
2.2 Product interface details
1, the normal mode interface
Note: Short press the button SW to switch the display of current, power, discharge capacity and discharge time of the display. Press and hold the SW button to switch the display of the voltage and temperature of the display. OUT is displayed when the output is turned on, and OUT is not displayed when the output is turned off.
2, protection mode interface
Note: When the parameter measured by the voltage ammeter exceeds the set parameter threshold, enter the protection mode, display the protection code, the output is turned off, the LED light flashes, and the buzzer alarms. In protected mode, press the button ON to exit the protection mode.
3, setting mode interface
Note: In the normal mode, long press the button ON to enter the setting mode. In the setting mode, press and hold the button ON to enter the normal mode.
In the setting interface, short press the button SW to switch the parameters that need to be set. Short press the button + or - to adjust the parameter size. In the display timeout or super capacity interface, short press the button ON to select to turn on or off the timeout protection or over capacity protection. They are off by default.
2.3 Product Application Details
1. As a voltmeter, ammeter, and power meter, use it in series.
2. Battery charging application, as follows:
Steps for usage:
2.1. Connect the power module and battery according to the above diagram and check if the wiring is correct.
2.2, power on, enter the normal interface as shown above.
2.3. Press and hold the ON button to enter the setting interface. The SET is displayed in the lower left corner of the LCD screen.
2.4. Short press the SW button to switch to the parameter interface that needs to be set. Short press + or - button to adjust.
In battery charging applications, the LVP needs to be adjusted below the minimum battery voltage, the minimum is 4.8V. Adjust the OVP to the highest voltage that the battery is allowed to fully charge (this voltage needs to refer to the parameters in the battery manual). Generally, the maximum charging voltage of a 12V lithium battery is 14V. The maximum charging voltage of a general 24V lithium battery is 28V.
2.5. Press and hold the ON button to exit the setting mode.
2.6. Short press the ON button, the indicator light is always on, the output is turned on, and the battery starts to charge.
2.7. If the battery voltage rises to the value set by OVP, the output is turned off, the battery stops charging, the LCD screen displays OVP, the indicator light flashes, and the buzzer alarms.
2.8. If you need timed charging or constant capacity charging, you can set the OHP (timing) or OAP (fixed capacity) parameters in the setting mode. Setup steps: Under the setup interface, short press the SW button to switch to the OHP or OAH interface. Short press the ON button to turn on the timing or constant capacity function. The LCD interface goes from OFF to digital. Press + or - to adjust the parameter size. After setting the parameters,
Press and hold the ON button to exit the setting interface. When the time or capacity reaches the set value, the output turns off and stops charging. The LCD displays the OHP or OAP code, the indicator light flashes, and the buzzer alarms.
3.Battery discharge application, as follows
4.Steps for usage:
5.1. Connect the battery and load according to the above diagram and check if the wiring is correct.
6.2. The voltage ammeter enters the normal interface.
7.3. Press and hold the ON button to enter the setting interface. The SET is displayed in the lower left corner of the LCD screen.
8.4. Short press the SW button to switch to the parameter interface that needs to be set. Short press + or - button to adjust the parameter, long press + or - button to make the parameter increase continuously or continuously. In battery discharge applications, the OVP needs to be set above the maximum battery voltage, up to 38V. Adjust the LVP to the lowest voltage allowed by the battery (this voltage needs to refer to the parameters in the battery manual). Generally, the minimum discharge voltage of a 12V lithium battery is 9.2V. 24V. The minimum discharge voltage of a lithium battery is 18.5V.
9.5. Press and hold the ON button to exit the setting mode.
10.6. Short press the ON button, the indicator light is always on, the output is on, and the battery starts to discharge.
11.7. If the battery voltage drops to the value set by LVP, the output is turned off, the battery stops discharging, the LCD screen displays LVP, the indicator light flashes, and the buzzer alarms.
12.8. If you need a timed discharge or a fixed capacity discharge, you can set the OHP (timing) or OAP (fixed capacity) parameters in the setup mode. Setup steps: Under the setup interface, short press the SW button to switch to the OHP or OAH interface. Short press the ON button to turn on the timing or constant capacity function. The LCD interface goes from OFF to digital. Press + or - to adjust the parameter size. After setting the parameters, press and hold the ON button to exit the setting interface. When the time or capacity reaches the set value, the output turns off and stops discharging. The LCD displays the OHP or OAP code, the indicator light flashes, and the buzzer alarms.
(ZK-SJVA-4X)
Features:
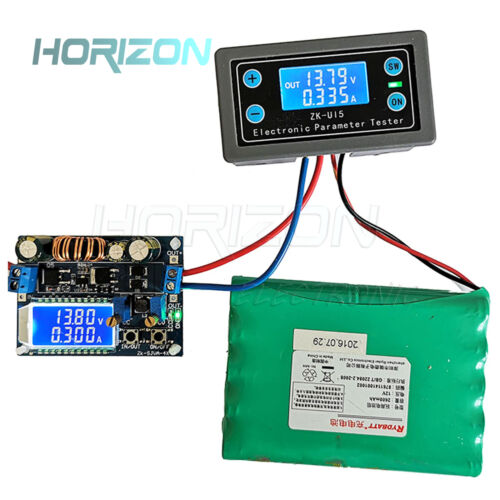
Buck-boost module constant voltage constant current LCD digital voltmeter ammeter adjustable buck boost
Buck-boost module (constant voltage constant current LCD version)
1. Product highlights:
1.1 LCD input and output voltage, output current output power;
1.2. Input anti-reverse protection, reverse connection will not burn;
1.3. Can be step-up and step-down, the output voltage 0.5-30V arbitrary regulation, limiting the current 0-4A arbitrary regulation;
1.4 output anti-intrusion, the battery charge without additional anti-reflux diodes;
1.5. Button control output ON / OFF status, and you can set the power-on default is ON or OFF;
1.6. Ascending and descending chip used as the main controller, external 60V 75A MOS tube as a switch, double 60V 5A SS56 Schottky rectification, 60V voltage value, superior to the market immature XL6009 / LM2577 program (a lot Device pressure value is not enough, MOS tube and Schottky diode pressure value must be greater than the input plus input voltage value);
1.7. Output ripple small, LC filter;
1.8. With heat sink, send module support isolation column.
2. Product parameters:
Input voltage: 5.5-30V (input voltage 5V, you can normally achieve buck-boost, but the voltage and current meter values are not accurate; less than 4.7V, undervoltage protection)
Output voltage: 0.5-30V
Output current: long-term stable work in 3A, strengthen the heat can reach 4A
Output power: 35W natural cooling, heat dissipation to enhance 50W
Voltage display resolution: 0.05V
Current display resolution: 0.005A
Conversion efficiency: about 88%
Soft-start: Yes (very powerful with load startup, startup may fail)
Input reverse protection: Yes
Output anti-intrusion: Yes
Short circuit protection: yes
Working frequency: 180KHZ
Size: L * W * H 66 * 48 * 21mm
Mounting hole: 4mm in diameter
Weight: 46g
3. Function Description:
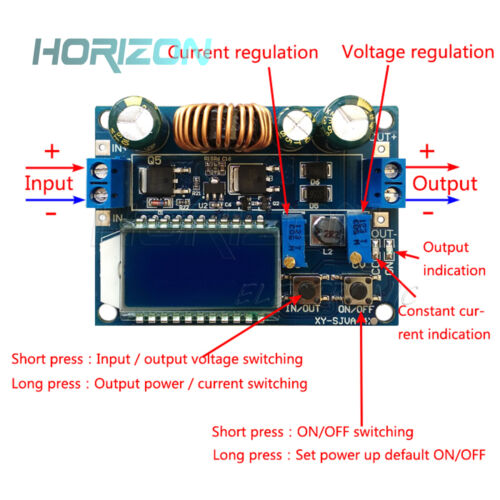
3.1. Module has IN / OUT, ON / OFF two buttons: IN / OUT button to switch the input voltage and output voltage display, long press to switch the output current output power display; ON / OFF button control output ON or OFF, long press Set power on default output status is ON or OFF.
3.2.CC is the current setting potentiometer, clockwise rotation, can increase the set current, when the load current reaches the set current, enter the constant current state, CC constant current indicator (red) lights up; the right CV is the voltage setting Potentiometer, clockwise rotation, can increase the output voltage. ON indicator is the output status indicator, when the output voltage is on, otherwise off.
4. How to use:
4.1. Used as an ordinary buck-boost module with over-current protection capability
(1) Adjust the CV constant voltage potentiometer so that the output voltage reaches the voltage you want.
(2) Measure the output short-circuit current with 10A current meter (connect the two test leads directly to the output end), and adjust the CC constant current potentiometer to make the output current reach the preset over-current protection value. (For example, if the current value displayed by the multimeter is 2A, the maximum current will only reach 2A when you use the module. When the current reaches 2A, the red constant voltage and constant current LED is on, otherwise the LED is off)
Caution: When using in this state, there will be a voltage drop of 0 ~ 0.2V due to the current sampling resistor at the output. At the same time, the input and output leads will have a certain linear voltage drop This is a normal phenomenon!
4.2. Used as a battery charger
Without constant current function of the module can not be used to charge the battery, due to the power of the battery and the charger pressure drop is large, resulting in charging current is too large, causing damage to the battery, so the beginning of the battery to use constant Flow charging, when the charge to a certain extent automatically switch back to constant voltage charging.
(1) Determine the float voltage and charging current for which you need the rechargeable battery (if the lithium battery parameter is 3.7V / 2200mAh then the float voltage is 4.2V and the maximum charging current is 1C, ie 2200mA)
(2) Under no-load condition, the multimeter measures the output voltage and adjusts the constant voltage potentiometer so that the output voltage reaches the float voltage. (If the 3.7V lithium battery is charged, adjust the output voltage to 4.2V)
(3) Measure the output short-circuit current with 10A current meter (directly connect the two test leads to the output terminal), and adjust the constant current potentiometer so that the output current reaches the predetermined charge current value;
(4) Connect the battery, charging.
(Steps 1, 2 and 3 are as follows: input termination power supply, the output is not connected to the battery load)
4.3. Used as LED constant current driver module
(1) Make sure you need to drive the LED operating current and the maximum operating voltage;
(2) Under no-load conditions, the multimeter measures the output voltage and adjusts the constant voltage potentiometer so that the output voltage reaches the maximum operating voltage of the LED.
(3) with a multimeter 10A current measurement output short-circuit current, while adjusting the constant current potentiometer so that the output current reaches the predetermined LED operating current;
(4) connected to the LED, test machine.
(Steps 1, 2, and 3 are as follows: Input the power and output the no-load LED.)
Note: This module is more than 3A, 35W use, please strengthen the heat! ! !
5. Note:
5.1. Module input IN- Prohibit short circuit with output OUT-, otherwise constant current function will be invalid.
5.2. Please make sure that the power of the power supply is greater than the power required by the output load!
5.3. If the module is to be fully loaded with output, the input voltage should be over 8V. When the input voltage is 5V, the output power is about 15W, and the voltage ammeter fails. Module current value 4A, the premise subject to the maximum output power, such as the output 17V, the current should not exceed 2A.
5.4. Module with output short-circuit protection, short-circuit protection module automatically shut down the output, the module can be restored on the power, if your power supply without output current limiting protection, it is recommended that the module input front-end fuse in series to increase the safety factor.
5.5. The module has input under-voltage protection function, the default is about 4.7V. Below this value, the output will be disconnected automatically and the module can be powered on again (note the voltage at the module port. When the input current is relatively large Do not ignore the partial pressure on the input wire).
Warranty and Guarantee
Feedback
Payment
About us
Shipment
Warranty and Guarantee
WE PROMISE YOU CAN GET THE ITEMS YOU PAID OR REFUND.
To USA: Send by e-package.
To other countries: Order more than , provide free tracking number. Order less than ,customer can pay to get a tracking number.
We located in the biggest electronic market in China--HQB(Shenzhen) ,Specialist in ICs over 10 years, we seek to establish long-term business relationships.
Feedback
We appreciate positive feedback . we always try our best to service our customers . so if you
have ant question ,PLEASE DON’T HESITATE TO CONTACT US IMMEDIATEDLY,
we are always here to offer help .
Payment
We prefer PayPal .For purchasing multiple items , please contact us for a combined invoice .
generally we would like to receive payment thin 48 hours if .
About us
PLEASE BUY WITH CONFIDENCE
We specialize in electronic components . ICs, Capacitors, Diodes, Resistors, LEDs,
NEW , ORIGINAL parts . please buy with confidence .We offer NO-QUESTION-REFUND
Shipment
We provide airmail service with good package . The items will be shipped within the nest
2 business days after we received the payment . when you buy multiple items ,your shipping
cost will be combined with discount .
go to my store
